

Containerization
To ease deployment, Xiid provides containerized images of certain products that can be run on any container platform.
Xiid's images are auto-activating, which makes them perfect for Kubernetes deployments.
Commander Container Image
The official Commander image can be found on Docker Hub or by simply pulling the xiidcorporation/commander image.
Additional documentation for using the container is located on Docker Hub.
STLink Container Image
The official STLink image can be found on Docker Hub or by simply pulling the xiidcorporation/stlink image.
Containerized STLink Usage
TIP
Base documentation for using the STLink container is located on Docker Hub and should be reviewed before proceeding.
Beyond typical Kubernetes use cases for the containerized STLink, it may often be useful to run an STLink container locally.
For example, consider the scenerio of a SOC team member who regularly uses their corporate STLink environment to access their corporate resources, but now needs to gain access to an external organization's resources that live on a separate Terniion fabric.
Running a secondary STLink in a container would allow this SOC member to access the external resources (bindings) they need, in an isolated way, without having to uninstall, modify, or otherwise re-configure their "normal" STLink installation.
Accessing a Containerized STLink's Bindings from the Host
WARNING
There are some special considerations, varying by OS, that apply when attempting to access containerized STLink bindings directly from the host.
The guidance below is generalized, and individual differences in your system and networking configurations may need to be taken into account.
Linux Hosts
In order for the containerized STLink to make its bindings automatically available on the host, removing network isolation between the STLink container and the host is required. This can be done via --net=host on Docker or --network=host on Podman.
Additionally, in order for the containerized STLink's service port to not conflict with the host's STLink, specifying a port number other than 10479 is highly recommended via the STLINK_PORT environment variable (available on STLink version >= 4.0.2).
As an example:
docker run -d --net=host -e XIID_ACTIVATION_CODE=[insert code here] -e STLINK_PORT=4567 xiidcorporation/stlink:latestIf --net=host is not allowed in your environment, manually exposing ports will be required, and bindings to this STLink must be bound to a port on 0.0.0.0 rather than any wildcard loopback address.
Windows and macOS Hosts
As Docker (and Podman) run containers in Linux VMs on Windows and macOS hosts, simply adding --net=host is insufficient, as the host in this case is the Linux VM, not the true Windows/macOS host.
Unless restricting bindings to ports on 0.0.0.0 (as noted above) and manually exposing them, Podman cannot be used as it does not have the capability to automatically bridge bindings from this Linux VM to the ultimate host.
Docker does support this functionality in macOS and consumer Windows editions, although it must be manually enabled inside Docker's configurations:
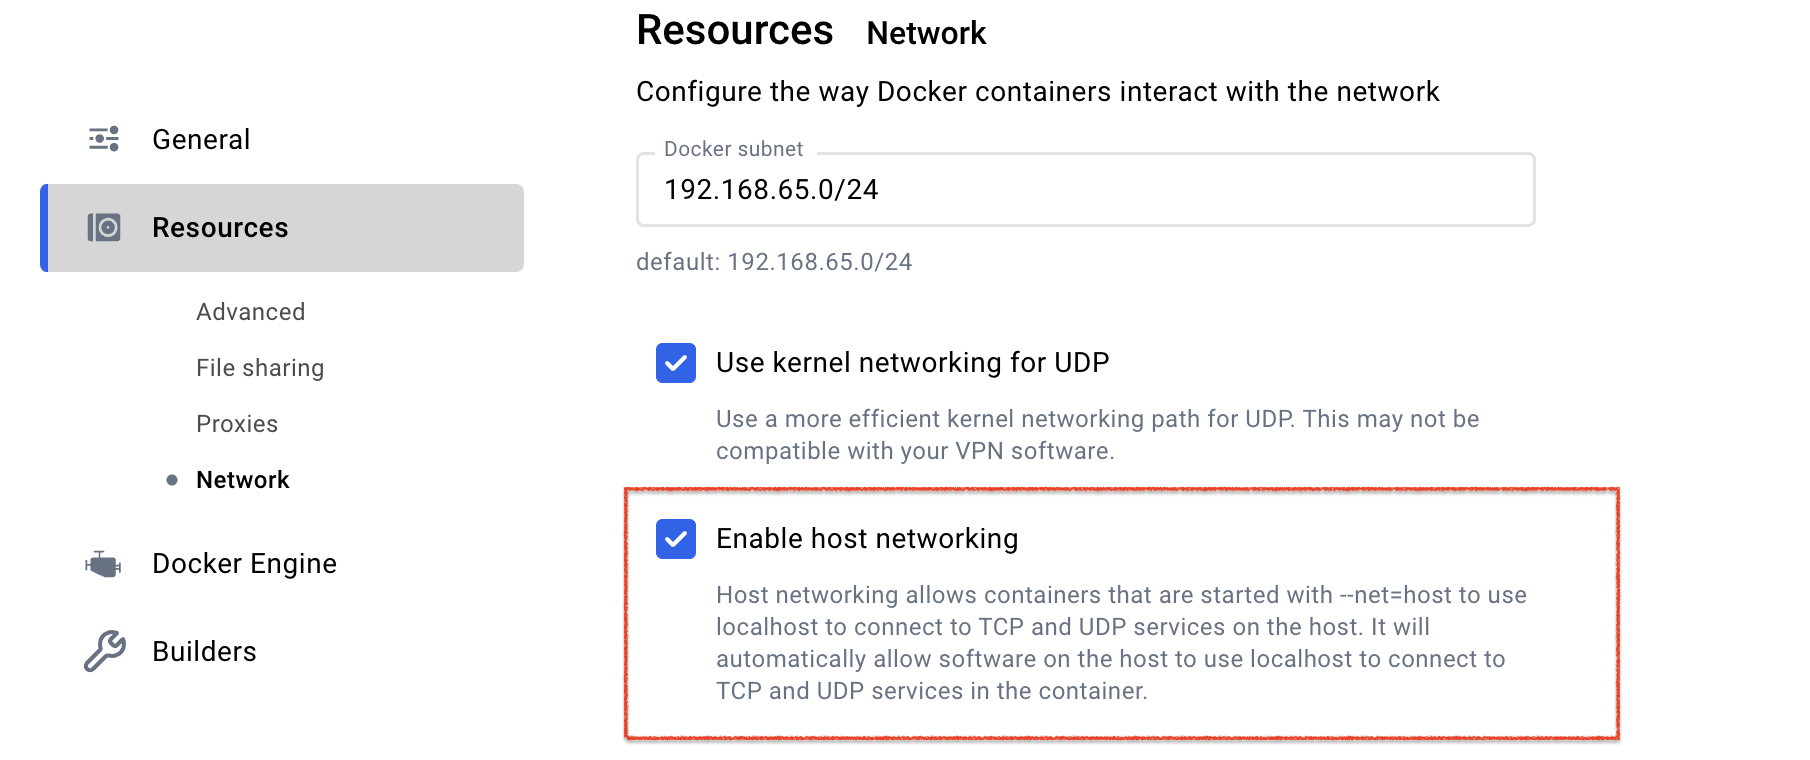
While specific instructions for Windows are coming soon in this guide, the steps below may be followed for macOS hosts.
Run this command to spin up an STLink container:
docker run -d --net=host -e XIID_ACTIVATION_CODE=[insert code here] -e STLINK_PORT=4567 xiidcorporation/stlink:latestOn macOS, some additional setup may be required to access your bindings.
If all bindings within the containerized STLink are limited to a port on 0.0.0.0, those bindings will be automatically accessible system-wide.
Unfortunately, macOS only activates 127.0.0.1 by default on the lo0 loopback interface. Partly for efficiency and perforamnce reasons, the rest of the 127.0.0.0/8 block is not usable without manual configuration, meaning that you must manually create aliases for other loopback IPs like 127.13.7.2 if you need them.
For example, if you want to access an STLink binding on 127.59.147.155 from an application running on your macOS host, you must run the following command on your macOS host's terminal:
sudo ifconfig lo0 alias 127.59.147.155 upSince performing the above manual step may be cumbersome, there are some third-party tools that have been developed that claim to automate this step. If you decide to employ one, please exercise caution when deploying them in your environments, as there may be (often significant) cybersecurity risks involved when using automated networking configuration tools.