High-Availability Gateway Setup
DANGER
The traffic routing out of Exitpoints is decrypted as it has already traversed the full SealedTunnel.
Throughout this documentation, we have presumed that Mapping Configurations are loopback addresses. However, this is not actually a requirement of SealedTunnel.
In fact, SealedTunnel traffic can be routed from just about anywhere, so long as it's accessible from the Exitpoint.
If you would like to configure access to multiple machines using a single STLink, as a Sealed Network Gateway follow the instructions below.
Configure the Sealed Network Gateway
- Create an Exitpoint for the machine that will serve as the gateway.
- When adding Mappings, rather than using a loopback address, use the private IP address of the machine you would like to access within the same subnet as well as the port that you wish to access the machine on.
- Install the STLink on the gateway machine.
- There are no constraints on the machine other than that it must be accessible by all other machines you would like to access on the network.
This will work for accessing any resource on a separate machine, provided that the machine-level firewalls are configured appropriately.
If you have a web server running on a separate machine, for instance, and would only like to install the STLink on a single machine, you can route the traffic to port 443 (or 80) and responses will route back through the gateway's STLink.
High-Availability and Smart Load-Balancing
TIP
High Availability and Smart Load Balancing requires additional servers in the same subnet.
You can install multiple STLinks in the same subnet and configure them to distribute loads and failover in the event that a single Gateway Server goes offline.
- Complete the above gateway setup instructions before starting.
- Create a second Exitpoint for the machine that will serve as an additional gateway.
- Do not add any mappings to this Exitpoint
- Install the STLink software the additional gateway machine.
- There are no constraints on the machine other than that it must be accessible by all other machines you would like to access on the network.
- After installing and configuring the additional gateway Exitpoint, click the purple Pencil button next to the original Exitpoint set up in the gateway setup instructions that includes the mappings to resources within the subnet.
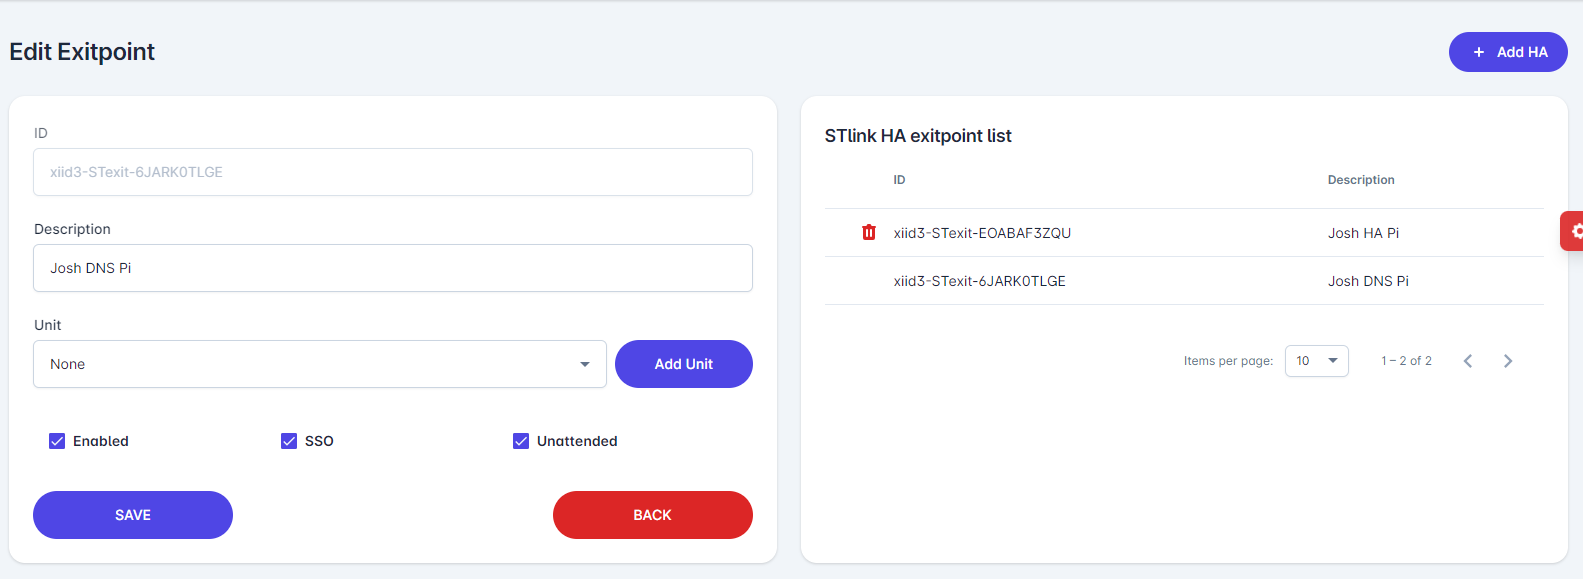
- Click the purple + Add HA button in the top right of the Edit Exitpoint screen. In the popup window, select the additional gateway Exitpoint from the dropdown list.
TIP
Only Exitpoints that do not contain mappings will appear in the HA dropdown list. If you do not see your Exitpoint listed, ensure that there are no mappings within that Exitpoint.
After you have added the additional gateway Exitpoint to the High Availability table of the original gateway Exitpoint, you will see it listed in the table on the right.

You can verify that High Availability is configured on the second Exitpoint by clicking the purple Pencil button next to the second Exitpoint. You will see all of the mappings from the main gateway Exitpoint listed under the mappings.
WARNING
You can use the High Availability functionality to migrate mappings from one Exitpoint to another. Be aware that when you click the red Trash Can button next to a High Availability Exitpoint in the HA Table, mappings will be removed from that Exitpoint.

