SealedTunnel EC2 Deployments in AWS
Overview
EC2 instances can be securely accessed via the SealedTunnel, eliminating the need for public IP addresses or open inbound ports.
This guide will walk you through how to deploy EC2 instances in AWS with pre-installed STLink software.
Prerequisites
You must have:
- The Xiid SealedTunnel product available in your environment
- An Entrypoint that you wish to access the EC2 instance from
- A valid AWS Account with permissions to deploy EC2 instances
Exitpoint Initial Setup
- Sign in to the Agent Configuration Portal and navigate to Exitpoints under the Tunnels tab on the left-side navigation.
- Create a new Exitpoint by clicking the purple + New Exitpoint button in the top right.
- Provide a
Descriptionand select anyUnitsto associate with the EC2 instance you are about to deploy. - After reviewing the information, click the purple Save button in the bottom right.
- Retrieve the
Exitpoint Activation Code, as you'll need it soon.
Deploy the EC2 Instance
TIP
You should disable auto-IP assignment from the subnet as you don't need a public IP address assigned to the instance.
Now that your Exitpoint is set up, you can deploy your EC2 instance.
- At the bottom of the EC2 Launch page, click the dropdown for
Advanced details. - Locate the
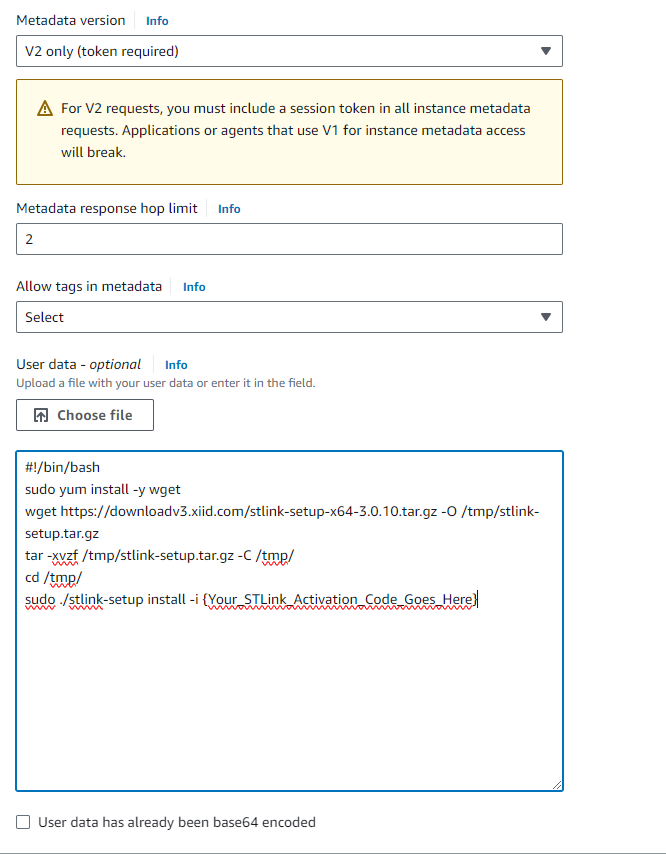
User datasection (shown below):

Paste the script below into User data, replacing {Your_Activation_Code} with the Exitpoint Activation Code from the Exitpoint that you just set up.
<script>
curl -L "https://downloadv3.xiid.com/stlink-setup-windows-3.1.5.exe" -o %APPDATA%\stlink.exe
%APPDATA%\stlink.exe install -i {Your_Activation_Code}
</script>#!/bin/bash
curl -o /tmp/stlink-setup.tar.gz https://downloadv3.xiid.com/stlink-setup-x64-3.0.11.tar.gz
tar -xvzf /tmp/stlink-setup.tar.gz -C /tmp/
cd /tmp/
sudo ./stlink-setup install -i {Your_Activation_Code}#!/bin/bash
curl -o /tmp/stlink-setup.tar.gz https://downloadv3.xiid.com/stlink-setup-arm-3.0.11.tar.gz
tar -xvzf /tmp/stlink-setup.tar.gz -C /tmp/
cd /tmp/
sudo ./stlink-setup install -i {Your_Activation_Code}#!/bin/bash
curl -o /tmp/stlink-setup.tar.gz https://downloadv3.xiid.com/stlink-setup-darwin-x64-3.0.11.tar.gz
tar -xvzf /tmp/stlink-setup.tar.gz -C /tmp/
cd /tmp/
sudo ./stlink-setup install -i {Your_Activation_Code}#!/bin/bash
curl -o /tmp/stlink-setup.tar.gz https://downloadv3.xiid.com/stlink-setup-darwin-arm-3.0.11.tar.gz
tar -xvzf /tmp/stlink-setup.tar.gz -C /tmp/
cd /tmp/
sudo ./stlink-setup install -i {Your_Activation_Code}Optionally, you can change the version number in the URL used above (https://downloadv3.xiid.com/stlink-setup-x64-3.0.11.tar.gz) to another valid Xiid STLink version.
- After reviewing the information, launch your EC2 instance and return to the EC2 screen that lists your launched instances.
- Wait for the Status Check column to show 2/2 checks passed in green text before proceeding.
You now have a deployed EC2 instance with the Xiid STLink software pre-installed!
Configure EC2 Access
Next, let's configure access to the new EC2 instance using the Xiid Configuration Portal.
- Sign in to the Agent Configuration Portal and navigate to Exitpoints under the Tunnels tab.
- Find the new Exitpoint that we created earlier in this guide and verify that the Initialized and Online columns show a green checkmarks.
- Click the purple Edit button to the left of the Exitpoint.
- If you deployed a Windows EC2 instance and would like to RDP into the instance, simply click the + Add RDP Mapping button and RDP access will be added to the Exitpoint.
- If you deployed a Linux EC2 instance and would like to SSH into the instance, click the + Add Mapping button, provide a
Descriptionfor the mapping (i.e.SSH Access) and enter127.0.0.1:22into the Map To field. - Set the
Applicationdropdown toNoneand click the purple SAVE button. - After adding the mapping, check the
Unattendedcheckbox and click the purple SAVE button.
Add Entrypoint Access
Finally, set up access from an Entrypoint to access the EC2 instance (Exitpoint).
You can add ST-RDP Access to enable RDP access for a Windows EC2 instance through the SSO Portal.
For other types of access:
For ST-RDP Access, use the SSO portal as outlined in the ST-RDP guide.
If you are using the SealedTunnel Application to access the EC2 instance, you can use Custom Variables to set up quick access to your EC2 instance.
- For example, add the following into the helper field:
ssh -p $port -i {your_pem_file} ec2-user@$addr- Note:
ec2-useris the default user for RHEL and Amazon Linux. - Note: replace
{your_pem_file}with a path to your PEM file.
If you are using the Standalone SealedTunnel to access your instance, you can connect by doing the following:
- For Linux EC2 instances, connect via SSH as you normally would.
- If you are not using port
22, use the-pflag to specify the port - Make sure you use your Standalone SealedTunnel loopback address
- If you are not using port
- For Windows EC2 instances, you can connect via RDP as normal
- Create a
.rdpfile with the information for your Standalone SealedTunnel
- Create a

