Remote Desktop (RDP) and VDI Setup
WARNING
RDP Agents must be able to register themselves with an Xiid IM Agent. If you set up an RDP Agent prior to setting up and configuring an Xiid IM Agent, the RDP Agent will not be able to be configured.
This section will walk through setting up RDP/VDI and making access available through your SSO Portal(s).
RDP Agent Creation
First, we need to create an RDP Agent Component in the Xiid Global Management Portal.
- Sign in to the Xiid Global Management Portal and navigate to the RDP Agents tab.
- On the RDP Agents tab, click the purple New RDP Agent button in the top left.
- On the RDP Agent Info screen, provide a name that helps you remember what RDP machine this is.
- Then click the green Save button in the top right corner.
- Notice in the RDP Agents table there is a new row for your new RDP Agent. Also take note that the initialized column has a red X, which indicates that the RDP Agent Component has not been bound to a running RDP Agent on a machine.
- On the RDP Agents tab, locate your newly-created RDP Agent and click the blue </> icon in the Code and Info column (shown below in green).

- A window will pop up with your
Activation Codefor this RDP Agent. Click the green Copy button to copy the code to your clipboard. Please note that sometimes the clipboard does not persist over an RDP connection and you may need to record this code manually.
RDP Agent Setup
With our new RDP Agent provisioned, we’re ready to install it on the machine we wish to be able to RDP into.
- Sign in to the Xiid Global Management Portal and navigate to the Download tab.
- Click the Download button on the RDP Agent Installer icon shown in light green.
- Log into the RDP instance and FTP the RDP Agent Installer to the RDP instance. Alternatively, if your RDP instance has external internet access, you can download the RDP Agent Installer directly on your RDP instance.
- Run the RDP Agent Installer executable on your RDP instance and move through the prompts.
- After the installation completes, a browser will open and ask for your Code, which is the
Activation Codeyou obtained in the prior step.
Your RDP Instance is now running the Xiid RDP Agent for secure RDP connection!
RDP Application Setup
DANGER
Never allow the sole administrator account for the machine to be the RDP Agent's User.
Since the RDP Agent automatically rotates user passwords, subsequent use of the RDP Agent could cause the administrator to become permanently locked out of the machine.
TIP
The following instructions pertain to setting up an RDP Application without the use of SealedTunnel. If you'd like to use RDP over SealedTunnel, follow these instructions instead.
Now that an RDP Agent is configured and bound in the Global Managament Portal, adding an RDP Application to your SSO Portal(s) makes it possible to RDP into that machine.
- Sign in to the Xiid Agent Management Portal on your domain controller (or Active Directory Network-adjacent server) and navigate to the RDP Agents tab.
- You should see a row populated in the RDP Agents table for your new RDP Agent. The status column should now show a green checkmark.
- After confirming that your IM Agent is aware of your RDP Agent and ready to use it, you can navigate to the Applications tab.
- On the Applications tab, click the purple Choose button at the bottom of the RDP card.
- On the Applications List for RDP Page, click the purple Add Application button in the top right.
- Choose the SSO Portal through which you would like be able to access the RDP Connection in the
Portaldropdown. - In the
RDP Agentdropdown, select the RDP Agent you created. - For
User, you can provide a username that will always be used for sign-in. This is optional, and if you leave the field blank the username of the user that is signed in to the SSO Portal will be used. Never setUserto the sole administrator account. - In the
IP Addressfield, you can provide a static IP address for the RDP instance. If you leave this field blank, the IP address will be dynamically linked to the machine running the RDP Agent. That way, if the RDP machine is assigned a new IP Address, the new address will be automatically used in the SSO portal. - Check the
Legacycheckbox to enable.rdpfile availability in the SSO Portal in addition to the.wrafile. - Finally, provide a description for the RDP Application that helps you remember its purpose.
- Click the purple Save button and your RDP Connection will be ready for use!
Xiid RDP/VDI App Setup
Instead of granting access to a whole machine, you can grant access to just a single application running on that machine with an RDP/VDI App.
- Sign in to the Xiid Agent Management Portal on your domain controller (or Active Directory Network-adjacent server) and navigate to the RDP Agents tab.
- You should see a row populated in the RDP Agents table for your new RDP Agent. The status column should now show a green checkmark.
- After confirming that your IM Agent is aware of your RDP Agent and ready to use it, you can navigate to the Applications tab.
- Click the purple Choose button in the RDP App card.
- On the Application List for RDPAPP screen, click the purple Add Application button in the top right.
- On the next screen, select the SSO Portal to assign the RDP App Application to in the
Portaldropdown. - Next, in the
RDP Agentdropdown, select your RDP Agent. - For
User, you can provide a username that will always be used for sign-in. This is optional, and if you leave the field blank the username of the user that is signed in to the SSO Portal will be used. Never setUserto the sole administrator account. - In the
IP Addressfield, you can provide a static IP address for the RDP instance. If you leave this field blank, the IP address will be dynamically linked to the machine running the RDP Agent. That way, if the RDP machine is assigned a new IP Address, the new address will be automatically used in the SSO portal. - Check the
Legacycheckbox to enable.rdpfile availability in the SSO Portal in addition to the.wrafile. - Provide a description that helps you remember what application this is and who it is for.
- In the
Application Pathfield, provide the full file path to the application you would like to access over remote connection. The application must be available on the RDP machine. Do not worry about the formatting of the path (e.g. backslashes and whitespace). Example:C:\Windows\notepad.exe - Click the purple Save button and your RDP Connection will be ready for use!
RDP Wrapper Setup
TIP
The RDP Wrapper is purely optional and is not required to access any resource through Xiid.
Currently, the RDP Wrapper software is only available for Windows.
In lieu of pasting a clipboard-injected one-time-password into your RDP application to access a machine through the SSO Portal, Xiid provides RDP Wrapper software that includes the one-time-use credential preconfigured.
- From the Download tab in the Xiid Global Management Portal, download the RDP Wrapper installer (green icon).
- Run the RDP Wrapper Installer on every machine that you wish to RDP from.
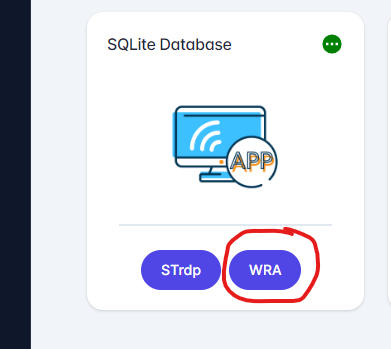
Users can sign in to the Xiid Single Sign-On portal, find the RDP Application, click the WRA button and access the machine or application without having to paste a one-time-use password.
RDP Wrapper Auto-Open Setup
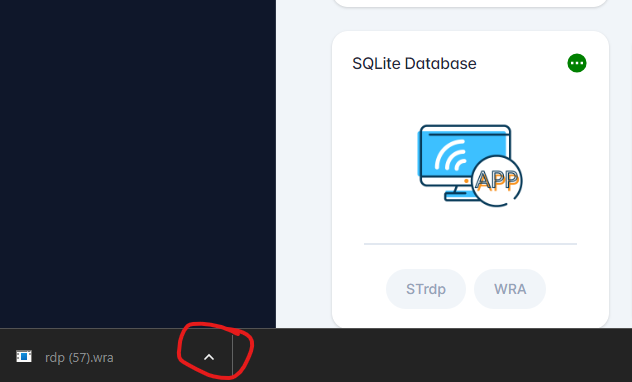
- To enable WRA files to open automatically when they are downloaded in Chrome, start by downloading a WRA file through the SSO portal.

- After the WRA file is downloaded, near the bottom of Chrome, there will be a pop-up with the file download shown. Click the "Up Arrow" next to the file as shown below:

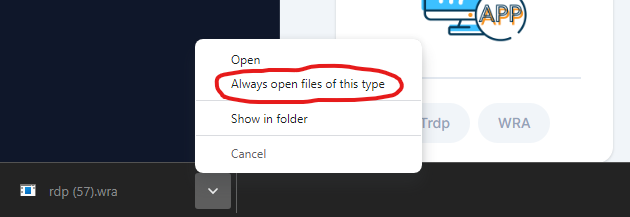
- Select
Always open files of this type

- And that's it! Moving forward, your WRA files will automatically open after being downloaded in Chrome and prompt you to connect to the instance or application.
Advanced Configuration
When using RDP or RDP App Applications (with or without the SealedTunnel), you may need to leverage dynamic users or reference an internal domain.
For instance, you may want to use a specific structure of local users and grant them all RDP access to the machine (i.e. username-rdp).
Dynamic Username Reference
TIP
Using %username% in the Username field is equivalent to leaving it blank.
You can use %username% in the Username field of an RDP and RDP App application to reference the user currently logged into the SSO Portal.
For instance, if you would like local users to be created dynamically for each user signing in to the machine, you can enter %username%-rdp as the Username.
This will tell the RDP Agent on the machine to create a new user based on the current logged-in user's username with -rdp appended. If the user is named xiiduser, for example, the user created locally on the machine will be xiiduser-rdp and a one-time-password will be generated for that user.
Domain Reference
You can reference the domain of the Active Directory by using the %domain% variable.
For instance, if you would like to cycle the password for a domain user in the Active Directory, you can enter %domain%\exampleuser in the Username field, and every end-user accessing the machine through the SSO Portal would sign in as exampleuser on the domain.
You can also combine variables: %domain%\%username% would rotate the Username of the domain user that is signed in to the SSO portal.
If you sign in to the SSO Portal as xiiduser and click an RDP or RDP App card's blue monitor icon, it will generate a new password on your domain user.
Agent Uninstallation
To uninstall an RDP Agent from a machine, you can run the uninstaller either from the Windows Add or Remove Programs menu or directly from the installation folder, located by default under: C:\Program Files\Xiid.IM RDP Agent\unins000.exe.
It is also recommended that you delete the RDP Agent object in the Global Management Portal after uninstalling completely from a machine.

