SSO Usage Instructions
For most applications in the Single Sign-On Portal, you will only need to click the icon corresponding to the Application and you will be automatically signed in and directed to the Third Party Application.
However, some applications may require additional steps to sign in. Below are the applications which require non-standard sign-in.
Connect to RDP/VDI
To start, sign in to the SSO Portal for your company or organization.
You will be taken to the home screen where you will see your available SSO-enabled applications.
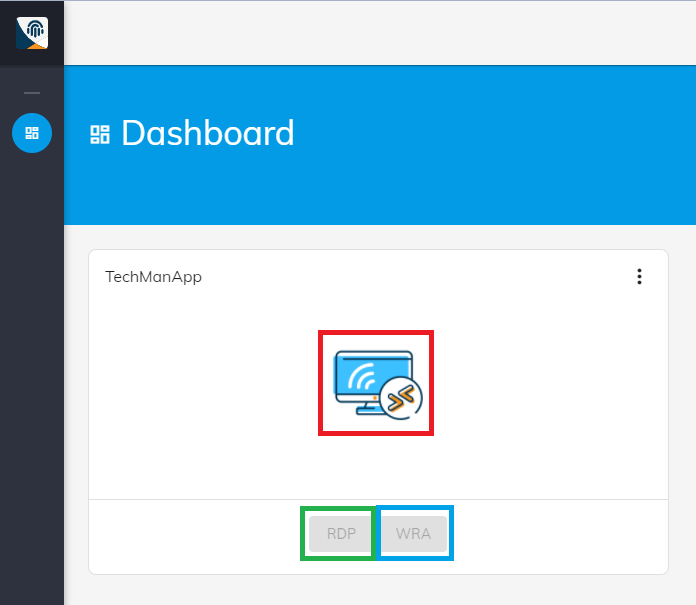
Locate the card for your RDP Connection or RDP App (VDI).
Notice that the RDP and WRA buttons are grayed out initially.
To access your RDP Application, start first by clicking the blue Monitor button in the center of the Application card (shown below in red). This will generate your dynamic RDP credentials and start an RDP Session.
After clicking that icon, the RDP and WRA buttons should change to a darker color indicating they are no longer disabled.
Click the RDP button to download the RDP connection file to connect to your instance. (shown below in green)
You can also click the WRA button to download the Xiid RDP Wrapped connection with additional security. (shown below in blue)
Click the downloaded RDP or WRA file to connect to your remote machine.
If you downloaded the RDP file, you will be prompted to sign in to the user account defined in the Xiid Agent Management Portal RDP Application. The password was copied to your clipboard when you created the RDP Session above. Paste the password and you will connect to the remote machine.
The one time password must be used within 30 seconds and is only valid once.
Reset your XOTC Authentication
If you lose your phone or it is stolen, follow these instructions to reset your XOTC Authenticator and regain access to your SSO Portal.
Start by locating the recovery email sent during the SSO User Setup.
Click the orange Reset Your Second Factor Authentication button within the email and a browser will open.
On the Reset OTP screen, click the red Reset button.
When the prompt pops up for confirmation, click the red RESET button.
After you see the green text confirming that your XOTC has been reset, go to the main page of the SSO Portal.
On the home page of the SSO Portal, enter your full username including the domain (User Principle Name) and hit Login.
From the next screen, enter your password in the Password field and click LOGIN.
You will be prompted to enter an email address to recover your XOTC Authenticator. You may re-use the same email address as previously.
Next you will be prompted for the One-Time-Password sent to your recovery email address. Copy the OTP from your email and paste it in the SSO Portal.
Last, a window will pop up with a QR code. Switch to your XOTC Mobile App, hit the “+” (”plus sign”) button in the top right, enter a description for your new XOTC Security Profile, hit the QR Code button, and scan the code shown on the SSO Portal.
Now your account is reset with your new XOTC Authenticator on your new phone!