Sandbox Setup
Introduction
Xiid’s world-class security and access software integrates on top of a domain and a directory. Domains are considered critical infrastructure and system administrators are rightfully leery to tamper with their domain using software that they are unfamiliar with. Domain modifications – particularly for security – require concise and well-understood changes. For this reason, Xiid provides domain administrators with the ability to test Xiid’s software in a safe, secure, separate cloud environment that will not affect production domains. The automated Xiid Domain Sandbox Tools provide customers with the ability to quickly and inexpensively deploy (and destroy) this “sandbox” domain.
What is the Sandbox Domain?
The Sandbox Domain is a basic domain setup that can be easily deployed within a cloud provider (e.g., AWS, Azure) for testing purposes. The Sandbox Domain includes the cloud networking layers necessary for creating and managing a domain controller. A basic Virtual Private Cloud (VPC) is created, and subnetworking layer configurations and security are defined within the VPC. There are security groups wrapping the domain controller and RDP instance(s) with additional inbound/outbound network security to lock down access to the servers as much as possible.
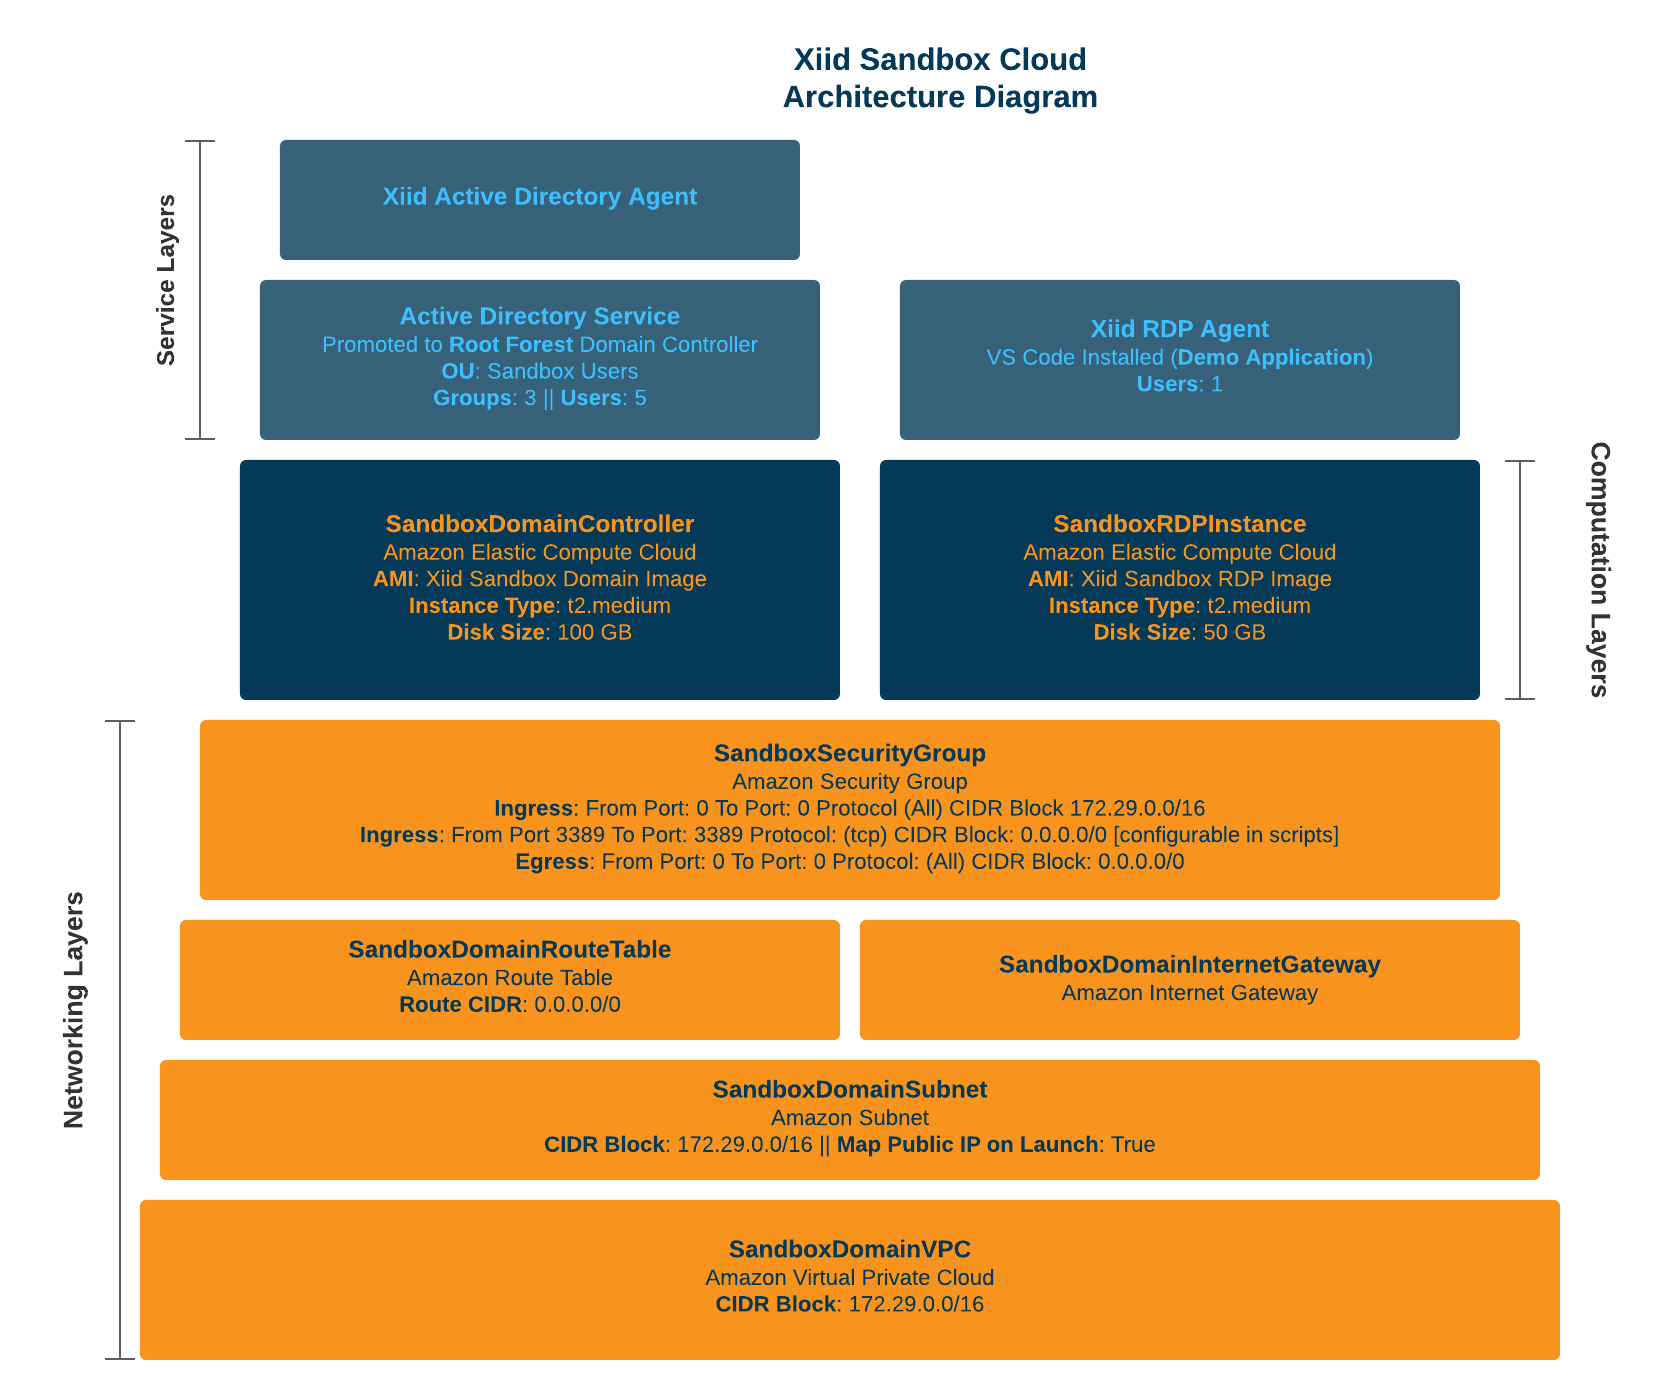
The architectural diagram below shows the infrastructure components deployed within your cloud computing account when you run the Xiid Domain Sandbox Tools’ scripts:
What the Sandbox Setup Guide Includes
This guide will walk you through setting up a “Sandbox” Domain for you to use in testing Xiid’s software.
For those wanting to use AWS for the sandbox, this guide also includes very minor AWS and Terraform instructions. If you are not familiar with AWS, it is recommended that you familiarize yourself with the AWS Console and CLI. That being said, there are no complex actions required within AWS, as all infrastructure and networking is configured and built automatically by the Xiid-provided scripts.
What the Sandbox Setup Guide Does Not Include
This guide will not provide background on managing domains, domain controllers, Active Directory, or other typical system administrator tasks. Typical use of Xiid’s software does not require in-depth knowledge of domain management. It is, however, advised that you understand how to manage (create/remove/update) users in Active Directory for additional testing.
This guide will not provide background on Terraform, any cloud providers (besides AWS), or any other infrastructure setup. The terraform scripts and infrastructure setup used in this guide are purely for Sandbox/testing purposes. We advise against using these scripts to build a production domain.
What You Will Need
The following are required for using the Xiid Domain Sandbox Tools for an AWS deployment:
An AWS Account
An Xiid Domain Sandbox Tools package (contact sales@xiid.com to request it)
If you wish to use a different cloud provider (Azure, GCP, XetaOne, etc.), Xiid will help you provision the sandbox for that environment.
Environment Setup
To start using the Xiid Sandbox Domain, you will first need to set up your computer and AWS account with the appropriate tools and configurations necessary for the Sandbox deployment. Follow the steps below to set up the AWS CLI and an IAM User.
AWS CLI Setup
Note: this step is not required if using macOS, as the macOS version of Xiid’s scripts install required dependencies automatically.
The Amazon Web Services Command-Line Interface is a tool which allows users to interact with AWS resources using command prompt. The AWS CLI operates as the “engine” behind Terraform, driving the deployment commands to your AWS account.
Download the AWS CLI here, open the installer, and move through the prompts.
After the installation is complete, you can open a command prompt or Terminal window and type aws to verify that the CLI was properly installed. You should receive a list of AWS commands available.
AWS IAM User Setup
First, sign in to the AWS Console at aws.amazon.com in a browser.
After signing in, navigate to IAM (Identity and Access Management) by clicking the black search bar in the top left, typing IAM, and selecting IAM from the list.
Click on Users on the left side navigation panel.
On the Users screen, click the blue Add users button in the top right.
Provide a username for your new user, leave the Provide user access to the AWS Management Console box unchecked, and click the orange Next button.
On the Set Permissions screen, click the Attach policies directly box near the top.
Select the AdministratorAccess policy and click the orange Next button.
Enter any tags you wish to associate with your user (this is optional), and then click Next.
Review your new user information, and if it all looks correct, click the orange Create User button.
Now, you will be taken back to the Users screen. Click the new user you just created, and select the Security credentials tab below the Summary box.
Scroll down to the Access keys section and click Create Access Key.
Select the Command Line Interface (CLI) option, select the checkbox next to I understand the above recommendation and want to proceed to create an access key, and click the orange Next button.
Enter any tags you wish to associate with your access key (this is optional), and then click Create Access Key.
The next screen will display your Access Key and Secret Key for the user.
Click the Download .csv file button above the table of new users to download the access key and secret key to your computer.
Do not lose track nor give away (privately or publicly) the access key, secret key, or csv file.
Later, after Xiid’s scripts have finished deploying your infrastructure, you may (but are not required to) delete this IAM user and follow the above steps to re-create the user before tearing down the infrastructure. If you do this, you will need to open a command prompt or Terminal window, run aws configure, and enter the new Access Key and Secret Key before running any infrastructure teardown commands or scripts.
Infrastructure Setup and Deployment
The following steps will help you get your workspace and infrastructure setup and deployed correctly.
Start by downloading the Xiid Domain Sandbox Tools zip file and unzipping it in a safe location.
Infastructure Deployment
To deploy the infrastructure in your AWS Account, follow these steps according to which operating system you use on the computer you’re going to deploy the sandbox from.
Windows Point-and-Click:
You can navigate to the unzipped folder for your Xiid Domain Sandbox Tools and double click the deploy_sandbox.bat file to deploy your sandbox environment to AWS.
Please note that if you choose this option, you are accepting the default values for ip_address and deploy_region, which are 0.0.0.0/0 and us-west-1 respectively.
Windows Command-Line:
Open a command prompt and navigate to the unzipped folder.
From the unzipped folder location, run the deploy_sandbox.bat Batch Script by typing deploy_sandbox.bat
You can specify zero, one, or two flags to the deploy_sandbox.bat script:
ip_address: The IPv4 IP Address to restrict RDP access to only your computer.
To specify the ip_address, you would run: deploy_sandbox.bat {your ip address}
deploy_region: The region to deploy your infrastructure in. The Region must be the second argument to the batch script. So if you do not want to specify an explicit IP address but would like to change the deployment region, you would run: deploy_sandbox.bat 0.0.0.0/0 {region_to_deploy}
rdp_count: The number of RDP Instances to deploy in your infrastructure. Rdp_count must be the third argument to the batch script.
As an example, a full command with arguments would look like this:
deploy_sandbox.bat 0.0.0.0/0 us-west-2 3
macOS:
Using Terminal, cd to the folder containing the unzipped Xiid Domain Sandbox Tools and run ./deploy_sandbox_macos.sh. By default, this uses the values 0.0.0.0/0 for ip_address and us-west-1 for deploy_region.
You can specify zero, one, or two arguments to the deploy_sandbox_macos.sh script:
ip_address: The IPv4 IP Address to restrict RDP access to only your computer.
To specify the ip_address, you would run: ./deploy_sandbox_macos.sh {your ip address}
deploy_region: The region to deploy your infrastructure in. The Region must be the second argument to the batch script. So if you do not want to specify an explicit IP address but would like to change the deployment region, you would run: ./deploy_sandbox_macos.sh 0.0.0.0/0 {region_to_deploy}
rdp_count: The number of RDP Instances to deploy in your infrastructure. rdp_count must be the third argument to the batch script.
As an example, a full command with arguments would look like this:
./deploy_sandbox_macos.sh 0.0.0.0/0 us-west-2 3
The script will automatically check if its dependencies, Homebrew, Terraform, and the AWS CLI, are installed on your Mac. If they are not, the script will offer to install them for you.
Linux:
Using your preferred terminal, cd to the folder containing the unzipped Xiid Domain Sandbox Tools and run ./deploy_sandbox_linux.sh. By default, this uses the values 0.0.0.0/0 for ip_address and us-west-1 for deploy_region.
You can specify zero, one, or two arguments to the deploy_sandbox_linux.sh script:
ip_address: The IPv4 IP Address to restrict RDP access to only your computer.
To specify the ip_address, you would run: ./deploy_sandbox_linux.sh {your ip address}
deploy_region: The region to deploy your infrastructure in. The Region must be the second argument to the batch script. So if you do not want to specify an explicit IP address but would like to change the deployment region, you would run: ./deploy_sandbox_linux.sh 0.0.0.0/0 {region_to_deploy}
rdp_count: The number of RDP Instances to deploy in your infrastructure. rdp_count must be the third argument to the batch script.
As an example, a full command with arguments would look like this:
./deploy_sandbox_linux.sh 0.0.0.0/0 us-west-2 3
The script requires the dependencies Terraform and the AWS CLI.
While Running the Sandbox Tools:
While running the sandbox deployment script for your operating system, you will be prompted for your Access Key and Secret Key. Enter those values from the instructions you followed in the AWS IAM User Setup section. You can hit enter to skip the region and output format.
Next you should see the terraform init command running automatically for you. You should see the message: Terraform has been successfully initialized!
Last, you will see terraform apply run automatically. The command will generate an execution graph. Confirm that there are 8 Plans to add, and then type “yes” to execute the plan.
Note: There are 7 core infrastructure components, plus X number of rdp instances, as specified by the rdp_count variable with a default of one. So if you chose 3 rdp instances, you would see 10 Plans to add.
Wait for the Terraform commands to finish setting up your infrastructure, and then you should see a final message saying: Apply complete! Resources: 8 added, 0 changed, 0 destroyed.
(If you are using Windows and ran the deploy_sandbox.bat file from command prompt, please note that after “press any key to continue…” the command prompt will be closed.)
After the Windows script finishes executing, you should observe a new batch script generated for you automatically called destroy_sandbox.bat. You can use that batch script to tear down your infrastructure when you are done (see Infrastructure Tear Down).
On macOS and Linux, instructions for infrastructure teardown are outputted to a file in your current directory named cleanup_instructions.txt.
CRITICAL NOTE: Do NOT delete, modify, or move the terraform.tfstate or terraform.tfstate.backup files. These files are used by Terraform to keep track of the infrastructure you just deployed. If you modify, delete or move these files, Terraform will no longer have the associations to your deployed infrastructure and cannot tear it down.
Infrastructure Validation
Once you have deployed your infrastructure, you can verify that the infrastructure is fully stood up and ready to go.
Start first by signing into the AWS Console and navigating to EC2.
Be sure to select the region in the top right corner that you chose when running the deploy_sandbox.bat script (the default region is us-west-1).
Click the Instances menu item on the left side of the EC2 console.
You should see two EC2 instances available in the EC2 console: one named SandboxDomainController and one named SandboxRDP.
Verify that there is a green checkmark listed under the Status Check column before attempting to access your instances.
Infrastructure Tear Down
NOTE: If you lost the terraform.tfstate or terraform.tfstate.backup files, you will not be able to tear down your infrastructure. Those files are used by terraform to reference the infrastructure previously created in the Infrastructure Deployment step.
Windows:
When you are done using your infrastructure and would like to tear it all down, double click the destroy_sandbox.bat file that was generated when running the deploy_sandbox.bat script. Terraform will print a destruction plan for your resources. Confirm that there are 8 Plans to destroy, and then type “yes” to execute the tear down.
Terraform is region-agnostic and region-ignorant, meaning that even after you deploy and retain the terraform.tfstate file, Terraform still doesn’t know what region the resources were deployed in. The destroy_sandbox.bat script will create the terraform destroy command and include the region you deployed to, ensuring that you can easily tear down the infrastructure after.
macOS and Linux:
On macOS and Linux, instructions for infrastructure teardown are outputted to a file in your current directory named cleanup_instructions.txt.
Running the command mentioned in the text file should successfully de-provision resources used for the Xiid Sandbox.