Remote Desktop and VDI Setup
Once your Single-Sign On Portals are set up, you can add External Applications for use within the SSO Portal for specific users.
This section will walk through setting up a Remote Desktop Application to use through the Single Sign-On Portal.
RDP Agent Component Creation
To start out, we need to create an RDP Agent Component in the Xiid Global Management Portal.
Sign in to the Xiid Global Management Portal and navigate to the RDP Agents tab.
On the RDP Agents tab, click the purple New RDP Agent button in the top left.
On the RDP Agent Info screen, provide a name that helps you remember what RDP machine this is.
Then click the green Save button in the top right corner.
Notice in the RDP Agents table there is a new row for your new RDP Agent. Also take note that the initialized column has a red X, which indicates that the RDP Agent Component has not been bound to a running RDP Agent on a machine.
RDP Agent Setup
With our new RDP Agent Component created, we’re ready to configure the RDP instance (the computer we are Remoting into) with Xiid’s technology.
Sign into the Xiid Global Management Portal and navigate to the Download tab.
Click the Download button on the RDP Agent Installer icon shown in light green.
Log into the RDP instance and FTP the RDP Agent Installer to the RDP instance. Alternatively, if your RDP instance has external internet access, you can download the RDP Agent Installer directly on your RDP instance.
Run the RDP Agent Installer executable on your RDP instance and move through the prompts.
After the installation completes, a command prompt will open and ask for your RDP Agent Code.
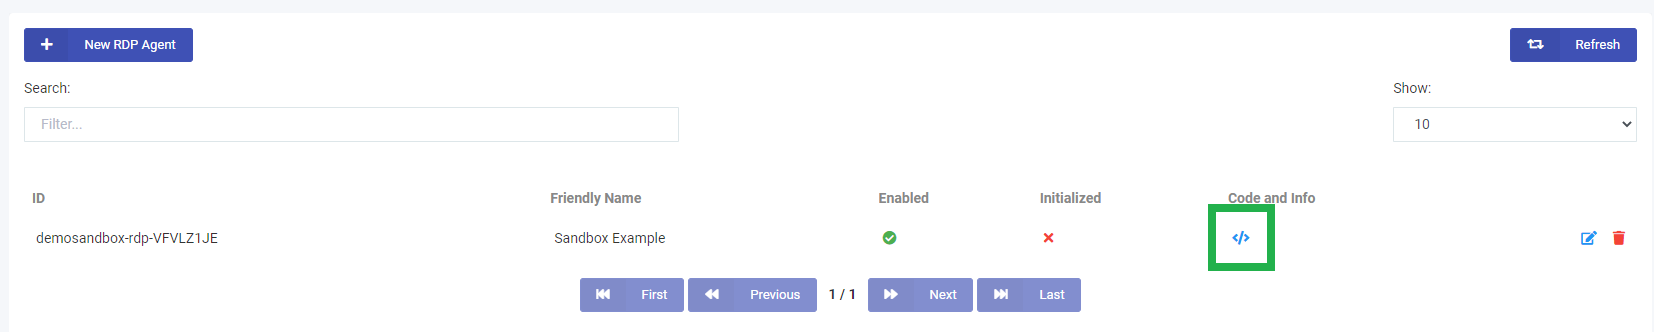
To get the RDP Agent Code, sign in to the Xiid Global Management Portal and navigate to the RDP Agents tab.
Locate the RDP Agent row in the RDP Agents table and click the blue </> icon in the Code and Info column. (Shown below in green)
A window will pop up with your Activation Code shown. Click the green Copy button to copy the code to your clipboard. Please note that sometimes the clipboard does not persist over an RDP connection, and you may need to copy the code elsewhere to propagate over to your RDP instance.
Now go back to your RDP Instance and paste the Activation Code in the command prompt and hit Enter.
You should see the command prompt indicate the installation was successful and close.
Your RDP Instance is now running the Xiid RDP Agent for secure RDP connections.
Note: The RDP Agent must register itself with the Xiid.IM Active Directory Agent. If you set up an RDP Agent prior to setting up and configuring your Xiid.IM Active Directory Agent, the RDP Agent will not be available in the RDP Agents Tab in the Agent Management Portal. You will need to restart the RDP Agent Service on the RDP instance after the Xiid.IM Active Directory Agent is set up and configured to finish the registration.
Xiid RDP Application Setup
Now that the RDP Agent is configured and bound in the Global Managament Portal, we can add an RDP Application to directly RDP into the machine.
Start by signing into the Xiid Agent Management Portal on your domain controller (or Active Directory Network-Adjacent Server) and navigate to the RDP Agents tab.
You should see a row populated in the RDP Agents table for your new RDP Agent. The entry in the “Status” column should say ready.
After confirming that your Active Directory Agent is aware of your RDP Agent and ready to use it, you can navigate to the Applications tab.
On the Applications tab, click the purple Choose button at the bottom of the RDP card.
On the Applications List for RDP Page, click the purple Add Application button in the top right.
Choose which SSO portal you would like to assign the RDP Connection to in the Portal dropdown.
In the RDP Agent dropdown, select the RDP Agent we previously created.
For the User, you can provide a username that will always be used for sign-in. This is optional, and if you leave the field blank the username of the user that is signed into the SSO Portal will be the used.
In the IP Address field, you can provide a static IP address for the RDP instance. If you leave this field blank, the IP address will be dynamically linked to the machine running the RDP Agent. So if the RDP machine is assigned a new IP Address it will be automatically used in the SSO portal.
Last, provide a description for the RDP Application that helps you remember its purpose.
Click the purple Save button and your RDP Connection will be ready for use!
Xiid RDP App (VDI) Application Setup
Start by confirming that the RDP Agent is available to your Active Directory Agent by signing into the Xiid Agent Management Portal.
Navigate to the RDP Agents tab and confirm that your RDP Agent is listed in the RDP Agents table.
Next, navigate to the Applications tab and click the purple Choose button in the RDP App card.
On the Application List for RDPAPP screen, click the purple Add Application button in the top right.
On the next screen, select an SSO Portal to assign the RDP App Application in the Portal dropdown.
Next, in the RDP Agent dropdown, select the RDP Agent that was confirmed in the RDP Agents tab.
For the User, you can provide a username that will always be used for sign-in. This is optional, and if you leave the field blank the username of the user that is signed into the SSO Portal will be the used.
In the IP Address field, you can provide a static IP address for the RDP instance. If you leave this field blank, the IP address will be dynamically linked to the machine running the RDP Agent. So if the RDP machine is assigned a new IP Address it will be automatically used in the SSO portal.
Provide a description that helps you remember what application this is and who it is for.
In the Application Path field, provide the full program file path to the Application you would like to access over remote connection. The application
must be available on the RDP machine. Do not worry about the formatting of the path (e.g. backslashes and whitespace). Example: C:\Windows\notepad.exe
RDP Wrapper Setup
Now that the RDP Agent is running on the computer we would like to remote to, we need to set up the client computer to integrate the RDP connection with Xiid.
Start by signing into the Xiid Global Management Portal and navigating to the Download tab.
Click the Download button on the dark green icon for the RDP Wrapper installation executable.
Run the RDP Wrapper Installer on every machine that you wish to RDP from.
No other installation is necessary for the RDP Wrapper.
At this point, users can sign in to the Xiid Single Sign-On portal, find the RDP Application, click the WRA button and remote into the machine safely and securely.