Sandbox Information
Understanding the Infrastructure
The following provides information regarding the Sandbox Domain Controller and Sandbox RDP Instance as well as usage instructions for accessing and utilizing the machines.
Domain Controller
Information
The Sandbox Domain Controller comes pre-installed with a number of users and groups in Active Directory, both for ease of access to the domain controller as well as to help expedite the process of using and understanding Xiid’s software. We encourage you to create any users and groups that you wish, as Xiid has only provided basic defaults.
Xiid highly recommends that you change the passwords associated with all users on the domain controller for maximum security.
What Is the Domain Controller?
The Domain Controller is an out-of-the-box Windows 2019 Server.
The Domain Controller has had the Active Directory Services installed and has been promoted to a Domain Controller as a new domain forest.
The domain name is sandbox.local.
The Domain Controller is not a DNS Server. If you would like to promote your Domain Controller to a DNS server, you can do so after deploying the sandbox domain, however be aware that you will need to reconfigure your DHCP Options Set in AWS and you will need a domain name from a trusted Certificate Authority.
Users:
There are a number of users created by default in the sandbox domain.
sandboxadmin: The administrator account for the Sandbox domain. See Domain Controller Usage for more information.
xiid-svc: Standard service account for use by the Authenticator component in your Xiid Agent. The default password is: Cyb3r$3cur!ty
sandbit: Short for SandboxIT, this is an example IT User on your domain, who may have access to an RDP instance not available to the broader company
sandboxengineer: Example engineer User on your domain, who may have access to a shared VS Code repository on an RDP instance.
sandboxuser: Example of a general user on your domain, only in the SandboxAll Security group.
Please note that the sandbit, sandboxengineer, and sandboxuser accounts are all disabled by default and the passwords are not provided. To use these users, open Active Directory Users and Computers and re-enable each account and set a password.
Groups:
A few basic Security Groups are created for you and the users are organized into these basic groups to facilitate access management examples.
SandboxAll: Security Group for all users in the sandbox OU. Members: sandbit, sandboxengineer, sandboxuser.
SandboxEngineering: Example Security Group for an Engineering Organization. Recommended to use with the VS Code application utilizing the RDP App Application in the Xiid Agent Management Portal. Members: sandboxengineer
SandboxIT: Example Security Group for an IT Organization. This is a useful group for demonstrating restricted RDP access to IT. Members: sandbit
Usage
Now that your infrastructure is deployed and verified, you’re ready to start using your sandbox domain.
Windows
Navigate to the AWS EC2 Console, find your domain controller, and copy the Public IPv4 Address.
Paste the IP Address into an RDP connection (.rdp) or into the RDP application of your choosing.
There is also a domain_controller.rdp file available to use. Right click the file in Windows File Explorer and click “Edit”.
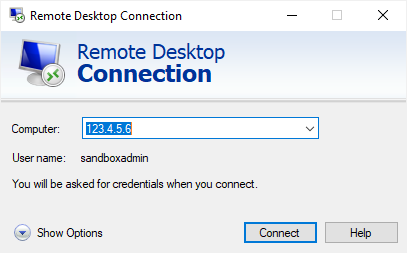
In the RDP Connection screen, enter the Public IPv4 Address copied above into the “Computer” section and click “Save” (under Show Options).
macOS and Linux
The domain_controller.rdp file has automatically been updated to use your new domain controller’s IP address, and you may use the file without further modification.
Double Click the domain_controller.rdp file and paste the password below to connect.
Domain Controller Admin Credentials:
Username: sandboxadmin
Password: 4CcXL!#X%JeU9@
We recommend that you change the sandboxadmin user’s password after logging in for maximum security.
After you log in to the instance, you can check the Active Directory Users and Computers to view the default users and groups.
The Xiid Active Directory Agent installer is already available on the desktop, just double click to start the installation process, and refer to our Quickstart Guide for assistance with configuring Xiid.
Sandbox RDP Instance
Information
The RDP Instance is a Windows 2019 Server and comes with a default Administrator user (called rdpuser), VS Code pre-installed, and the Xiid RDP Installer available on the desktop.
Usage
Windows
To access your Sandbox RDP instance, start by navigating to the EC2 Console in AWS, select the Instances tab on the left, find the SandboxRDP Instance, and copy the Public IPv4 Address.
In your sandbox folder, right click rdp_instance.rdp file and click “Edit”.
Enter the IPv4 Address that you just copied in the “Computer” section and click “Save” (under Show Options).
macOS and Linux
The rdp_instance.rdp file has automatically been updated to use your RDP instance’s IP address, and you may use the file without further modification.
Double click the rdp_instance.rdp file and enter the password below to connect.
RDP Instance Admin Credentials:
Username: rdpuser
Password: Cyb3r$3cur!ty
Advanced Features
Below are some advanced configuration and usage information. If you are familiar with AWS and Terraform, you can review the below information for making custom changes to the scripts to cater more to your individual needs.
Script Configuration
You can customize the following aspects of the main.tf Terraform script to cater your infrastructure to your preferences. Below are some common modifications to the script:
Instance Type:
You can configure the instance types for your Domain Controller and RDP instance, if you would like faster hardware to run your sandbox domain.
Modify the instance type on Line 97 (for the Domain Controller) and Line 111 (for the RDP instance) to any of the Amazon Standard Instance Types.
Note: Changing the instance type may incur additional charges from AWS. Please consult the AWS Pricing Guide for more information.
Disk Space:
You can configure the amount of disk space provisioned for your instances.
To change the disk space on the Domain Controller, modify the value on line 101. To modify the RDP instance disk space, modify the value on line 115.
Note: Changing the amount of partitioned disk space may incur additional AWS charges.
Using the Terraform Script Directly
If you do not wish to use the batch files and scripted Terraform integration, you can use the Terraform script directly to deploy your sandbox environment.
Follow these steps to deploy the sandbox environment using just the Terraform script.
Start by creating a new folder. For this guide, we will call that folder sandbox. Copy the main.tf script file to your sandbox directory.
Next, open a command prompt and navigate to the sandbox directory. Type aws configure and hit enter. The AWS CLI will prompt you for your access key and secret key and region. Enter the access key and secret key for your programmatic administrator access to AWS. The region will be defined by Terraform (you can skip it by just hitting enter, or you can type any region).
Ensure that Terraform is properly installed by typing terraform -h or terraform -version. You should see a list of Terraform commands (if you typed terraform -h) or the version of Terraform you are using (if you typed terraform -version).
Then type terraform init and hit enter. You should receive a message saying: Terraform has been successfully initialized!
Then type terraform apply. This will build and display an execution graph of the infrastructure to set up.
You can specify three variables to override in the Terraform script:
ip_address: Specify your IPv4 IP Address to restrict RDP access to only your computer. Default value is: 0.0.0.0/0 (any IP address can RDP to the machine with the admin username/password)
To override the ip_address variable, add: -var ip_address={your_ip_address}
deploy_region: Specify an region to deploy your infrastructure into. Default value is: us-west-1
To override the deploy_region variable, add: -var deploy_region={region_to_deploy}
rdp_count: Specify the number RDP Instances to launch alongside your Domain Controller.
To override the rdp_count variable, add: -var rdp_count={number_of_instances}
The full command would look like this: terraform apply -var ip_address=0.0.0.0/0 -var deploy_region=us-west-2 -var rdp_count=3
After running the terraform apply command with relevant flags, verify that there are 8 Plans to add, and then type “yes” to confirm. You can also check the execution graph in the console to verify the infrastructure that will be created.
Last, refer to the Infrastructure Validation section to verify that the sandbox was properly deployed.
When you are ready to tear down your infrastructure, type terraform destroy. If you deployed your sandbox domain in a region other than the default region (us-west-1), you will need to provide the region to the destroy command as such:
terraform destroy var deploy_region={your_region}
i.e. terraform destroy var deploy_region=us-west-2
Sandbox Resources
The following are descriptions of the resources created for the Sandbox Domain:
Terraform:
Required Version: >= 0.14.9
Provider:
Source: hashicorp/aws
Version: ~> 3.27
VPC:
CIDR Block: 172.29.0.0./16
Name: SandboxDomainVPC
Subnet:
CIDR Block: 172.29.0.0/16
Map Public IP on Launch: true
Name: SandboxDomainSubnet
Internet Gateway:
Name: SandboxDomainInternetGateway
Route Table:
Route:
CIDR Block: 0.0.0.0/0
Name: SandboxDomainRouteTable
Security Group:
Group Name: sandbox_domain_security_group
Ingress:
From Port: 0
To Port: 0
Protocol: -1 (All)
CIDR Block: 172.29.0.0/16
Ingress:
From Port: 3389
To Port: 3389
Protocol: tcp
CIDR Block: [0.0.0.0/0 by default, override by ip_address var]
Egress:
From Port: 0
To Port: 0
Protocol: -1 (All)
CIDR Block: 0.0.0.0/0
Name: SandboxSecurityGroup
Domain Controller:
AMI: OneOf(DC Images)
Instance Type: t2.medium
Disk Size: 100 GB
Name: SandboxDomainController
RDP Instance:
AMI: OneOf(RDP Images)
Instance Type: t2.medium
Disk Size: 50 GB
Name: SandboxRDPInstance
Infrastructure Costs
Please be aware of the costs associated with standing up infrastructure in AWS. You can refer to the AWS Pricing Guide for more information regarding costs. Please consider that the region you deploy your infrastructure in will also affect the cost. Also, the length of time with which you leave your infrastructure running will change the costs. If you are concerned about the costs of running your infrastructure in AWS, you can use free-tier infrastructure, which the automated sandbox deployment scripts attempt to choose by default. You can also stop your instances when you are not using them to save money.