Google Workspace Setup
As an optional step, you may set up integration with Google Workspaces for your Single Sign-On Portal. This will allow your employees to log in to their Workspace using Xiid’s secure authentication mechanisms. If your company is using Google Workspace, follow these steps below to configure your Google Workspace Integration with Xiid.
IdP Consumer Setup
Start by signing in to the Xiid Agent Management Portal and navigating to the IdP Consumers tab.
On the IdP Consumers screen, click the purple Add New IdP Consumer button in the top left.
Provide a Friendly Name for the IdP Consumer configuration and a Display Name that users will see in the SSO Portal.
Under the Type dropdown, select Google, then click the Next button.
Select an Internal to External Translator Group that translates from your internal LDAP credentials to your Google Workspace credentials. (See the Translator Setup section for more information).
Click the Next button and select the relevant firewalls for your Google Workspace or select the Default Firewall.
On the Parameters screen, enter the domain tied to your Google Workspace account. You can verify the domain tied to your Google Workspace account by signing into the Google Admin area and selecting Account->Domains from the left-side navigation.
Last, click the green Create IdP button at the bottom.
You will now see a new Google IdP Consumer listed in your IdP Consumers List.
Workspace Integration Configuration
After your IdP Consumer is set up, you need to finish configuring your Google Workspace integration with Xiid.
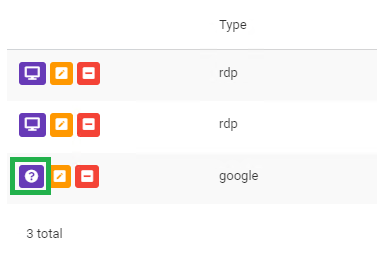
To get started, find your Google IdP Consumer in the IdP Consumers List, and click the purple question mark “?” button. (Shown below in Green).
This will pop up a new window with the last configuration steps necessary to finish your integration with Google Workspaces.
Follow the steps on the screen by signing into your Google Workspace account and clicking on the Admin App in your list of Applications.
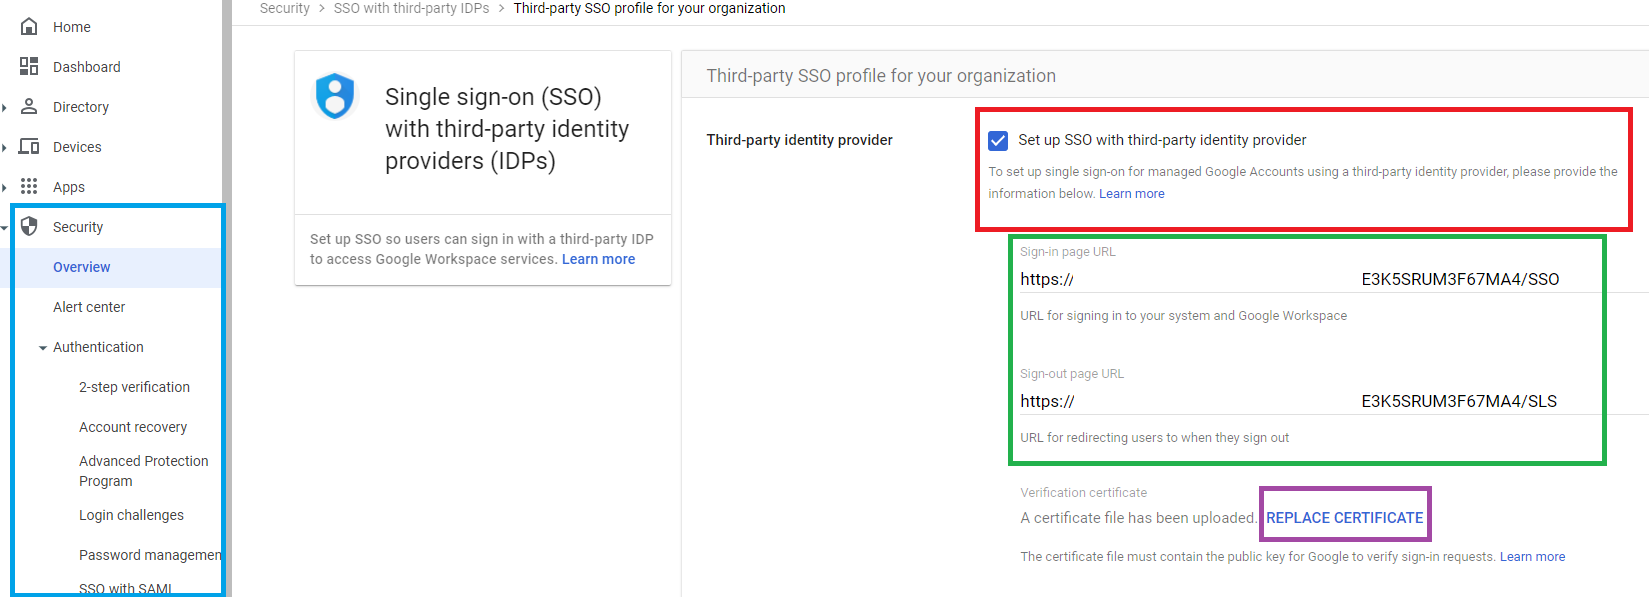
From the Admin App Screen, click the Security dropdown and select Overview (the Settings option shown on the Xiid Agent Integration window is not available on newer versions of Google Workspace).
Find the setting dropdown on the right side of the Security Overview screen that is called “Set Up Single Sign-On (SSO) With a Third Party IdP” and click the setting.
Click the section entitled “SSO profile for your organization” to edit your SSO settings.
You can also find the SSO configurations by selecting Security->Authentication->SSO with Third Party IdP. (Shown below in blue).
Check the box for “Set up SSO with third-party identity provider” (shown below in red) and then copy the Sign-In/Sign-Out URL from the Xiid Agent Google Workspace Integration screen (on the Set SSO and SLS step) and paste them in their respective fields in the Google Workspace Admin settings (shown below in green).
Next, download the certificate from the Xiid Agent Integration screen on the Load Certificate step, and then go to the Google Workspace Admin app, click the Replace Certificate text in blue, and then upload your certificate (shown below in purple).
Last, click the Save button at the bottom of the Google Workspace Admin app to persist the changes.
After the settings are saved in Google Workspace, go back to the Xiid Agent Integration screen, and click green Finish button.
Now your Google Workspace is set up, and you can sign directly into your workspace using the Xiid Single Sign-On Portal.